Most people assume vermicomposting needs a bin. It doesn’t.
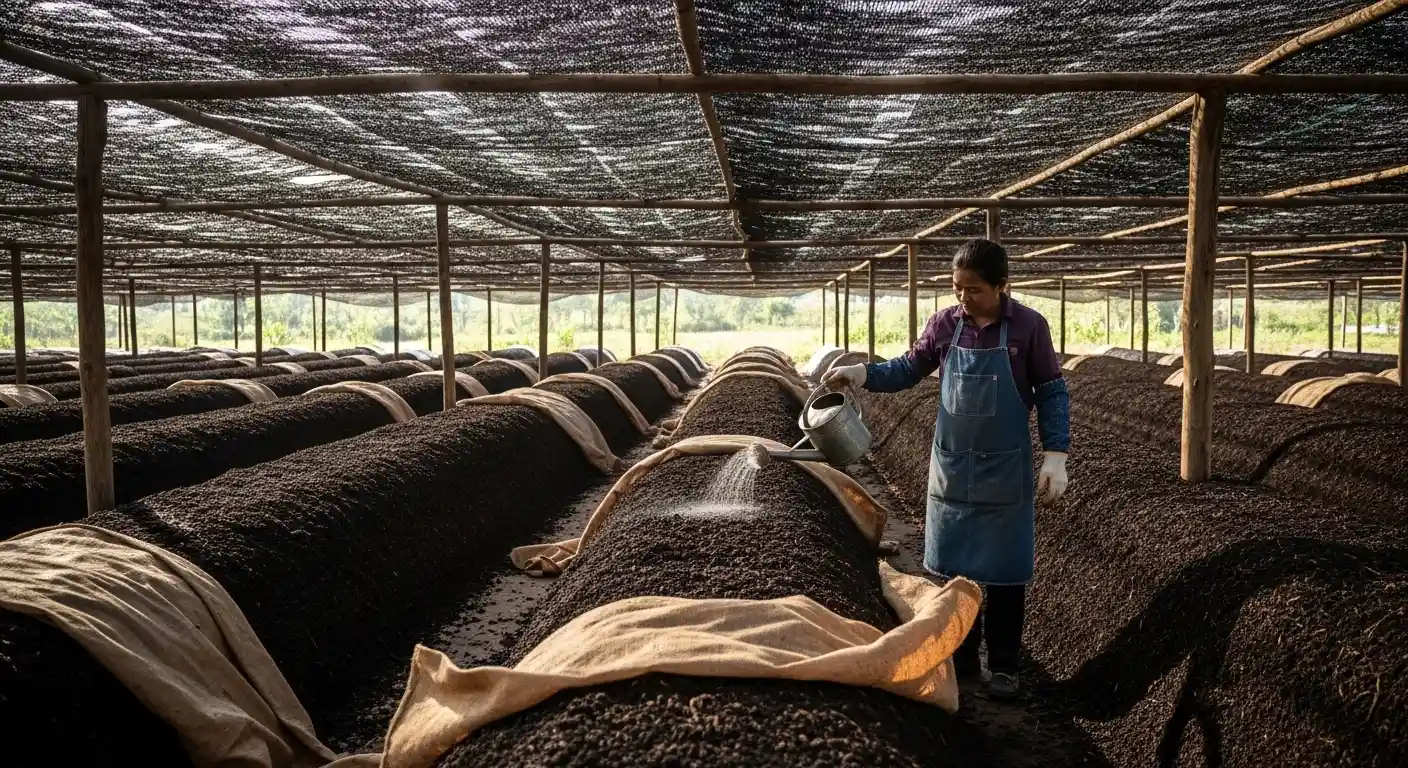
The heap method of vermicomposting is the simplest, most natural way to turn your organic waste into rich worm compost – directly on the ground, with no container, no construction, and no special equipment needed.
If you’ve been putting off vermicomposting because it seemed too complicated or expensive, this method removes every barrier.
In this guide, you’ll learn exactly how to set it up, maintain it, and harvest finished vermicompost in as little as 60 days – using nothing but organic waste, earthworms, and a shaded patch of earth.
What Is the Heap Method of Vermicomposting?
In the heap method of vermicomposting, organic waste and earthworms are layered directly onto loosened ground — no pit, no raised bed, no bin required. The heap rests on the earth itself, which means beneficial soil microbes and native organisms migrate in naturally from below, creating a richer end product than any container can match.
It’s the classic, original form of composting — with earthworms added to supercharge the process.
Here’s how it compares to the other vermicomposting methods:
| Method | Setup Needed | Best For | Scale |
|---|---|---|---|
| Bin Method | Container with drainage | Indoors / urban | Small |
| Bed Method | Raised brick or wood structure | Farm-level production | Large |
| Pit Method | Dug trench | Hot climates | Medium |
| Heap Method | None — open ground only | Beginners / outdoor | Any |
The heap method wins on simplicity. And when it’s done right, it produces vermicompost that’s just as nutrient-rich as any other method.
What You’ll Need Before You Start
Get these materials together before building your heap. Starting right makes maintenance far easier.
Organic feedstock
Kitchen vegetable scraps, garden trimmings, dried leaves, and agricultural waste. Chop or shred everything under 2 inches — smaller pieces break down faster and are easier for worms to consume.
Coarse dry base material
Straw, dry leaves, or small wood pieces. This bottom layer creates drainage and airflow, which prevents waterlogging — the number one threat to earthworms.
Cattle dung or pre-composted manure
Mix about 30% into your feedstock layers. It activates microbial life and is a food source worms actively seek out.
The right earthworms
This is the most important material choice you’ll make. You need epigeic (surface-feeding) species, not garden earthworms. The two best options are Eisenia fetida (Red Wigglers) and Eudrilus eugeniae (African Nightcrawler).
Both consume their body weight in organic matter daily under good conditions and thrive in surface-level heap environments.
Water
For maintaining 60–70% moisture throughout. The heap should always feel like a wrung-out sponge.
Shade covering
Gunny bags, straw, or broad leaves to cover the heap surface. This blocks light (worms are photosensitive), retains moisture, and buffers temperature. Never use plastic sheeting — it traps gas and overheats the heap.
A shaded outdoor location
Protected from direct sun, heavy rain, and strong wind, with loosened soil beneath.
Step 1: Choose and Prepare Your Site
Find a shaded area where direct sunlight doesn’t hit the ground for most of the day. Loosen the top 4–6 inches of soil with a fork or spade — this allows worms to burrow downward if conditions in the heap get too hot or dry, and it ensures natural drainage.
Plan your dimensions: a 3–4 ft wide base and a 2–3 ft target height is ideal for a first heap. You can scale up later using the same process.
Step 2: Lay the Base Layer
Spread a 3–4 inch layer of coarse dry material — straw, dry leaves, or small wood pieces — directly on the prepared ground. This is your drainage and aeration foundation. Without it, excess moisture pools at the bottom and creates anaerobic conditions that drive earthworms away.
Step 3: Build Your First Feedstock Layer
Add a 4–6 inch layer of chopped organic waste mixed with 30% cattle dung. Moisten the layer thoroughly — pour water slowly until the material feels like a wrung-out sponge. Squeeze a handful firmly: it should release just a few drops, not gush.
Sprinkle a small handful of mature compost or garden soil over the top. This introduces fungal and microbial life that works alongside the worms from day one.
Step 4: Introduce the Earthworms
Place your earthworms 2–4 inches beneath the surface of the first feedstock layer. A good starting density is 1 kg of worms per tonne of organic waste, or roughly 1,000–2,000 worms per square meter of heap base.
Cover them gently with a thin layer of moist material. They’ll burrow in within minutes once protected from light.
Step 5: Continue Layering
Build the heap upward by repeating this simple sequence:
- Thin layer of dry coarse material (for aeration)
- Thicker layer of moist organic feedstock + cattle dung (your main feed)
- Light dusting of soil or mature compost (microbial inoculant)
Keep the dry-to-green ratio at 3:1 throughout. Too much green (nitrogen-rich) material causes heat spikes that kill worms. Too much dry (carbon-rich) material slows decomposition. The 3:1 balance keeps everything cool, aerobic, and worm-friendly.
Keep layering until you reach your 2–3 ft target height. Always finish with a dry material layer on top.
Step 6: Cover and Label
Cover the entire heap surface with gunny bags, straw, or broad leaves. This covering does three things: it blocks light so worms stay active near the surface, it locks in the moisture you’ve built into the layers, and it prevents temperature swings.
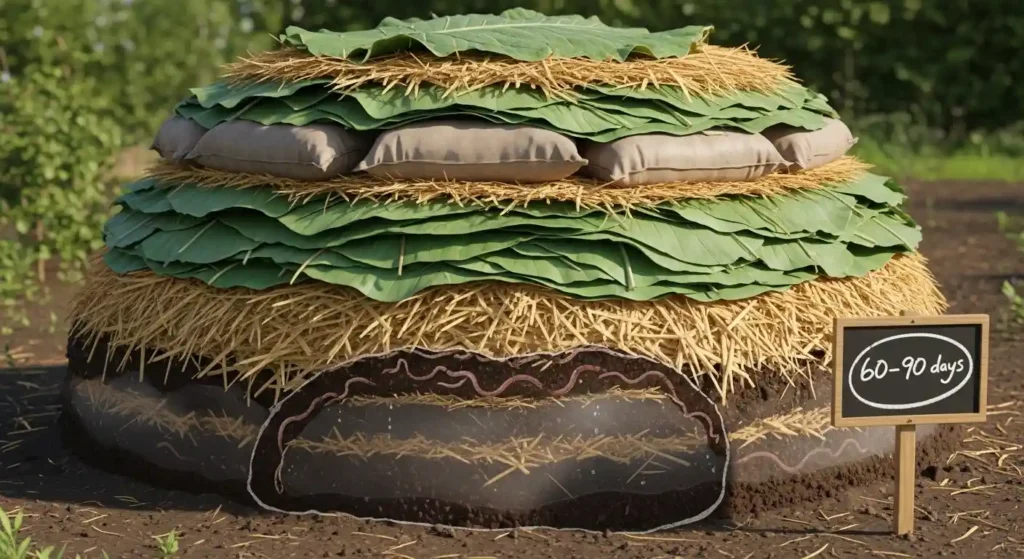
Note the date clearly — your vermicompost will be ready to harvest in 60–90 days.
How to Maintain Your Vermicompost Heap
The heap method is genuinely low-maintenance — your worms do the aeration, mixing, and decomposition. Your job is to keep conditions stable.
Moisture check every 2–3 days.
Use the squeeze test. Dry = worms die. Waterlogged = worms flee. You’re aiming for that wrung-out sponge feeling consistently. In hot summers, you may need to water daily.
Feed weekly.
Add a fresh layer of organic material to the top of the heap every week. Think of it as a living system — continuous input produces continuous output.
Check temperature.
Your target range is 18–35°C. Add extra straw insulation in cold winters. Increase watering and shade cover in hot summers.
Balance pH if needed.
A healthy heap smells like rich earth. A sour or acidic smell means the pH has dropped — add a light dusting of wood ash to correct it.
Protect from pests.
Keep the heap covered and never add meat, dairy, or oily food scraps. These attract rats, ants, and flies that disrupt the worm environment.
Here’s your maintenance schedule at a glance:
| Timeframe | Action |
|---|---|
| Every 2–3 days | Moisture check — squeeze test |
| Every week | Add fresh feedstock layer on top |
| Every 3–4 weeks | Gentle turn only if decomposition looks slow |
| 60–90 days | Harvest finished vermicompost |
How to Harvest Vermicompost from Your Heap
After 60–90 days, your heap is ready when the volume has reduced to about one-third of the original size, the material looks dark brown to black, it smells like rich forest soil, and almost no original feedstock material is visible anymore.
Two techniques work well for the heap method:
The Migration Method — push finished compost to one side of the heap. Add fresh feedstock and bedding to the other side. Within 1–2 weeks, worms migrate toward the fresh food. Harvest the finished castings cleanly from the original side while your worm population stays active on the other.
The Light Method — expose the top of the heap to direct sunlight briefly. Red wigglers are highly light-sensitive and burrow downward immediately. Scoop the top layer of finished castings, wait a moment for worms to descend again, then repeat until you’ve collected what you need.
Store finished vermicompost in breathable containers — burlap sacks, cardboard boxes, or wooden crates — at 40–60% moisture in a cool, dry space. Properly stored, it holds its nutrient content and microbial activity for several months.
Common Mistakes to Avoid in Heap Vermicomposting
Using plastic covers. It traps greenhouse gases and creates dangerous heat spikes. Always use breathable natural materials — straw, gunny bags, or dry leaves.
Dumping large amounts of fresh material at once. This generates too much heat. Add feedstock gradually in layers rather than in large batches.
Too many acidic ingredients. Citrus peels, tomatoes, and excess coffee grounds acidify the heap. Add these in moderation and balance with wood ash if the heap starts smelling sour.
Ignoring moisture extremes. Both dry and waterlogged conditions kill or drive away worms. The squeeze test every 2–3 days keeps you on track.
Building in direct sunlight. Vermicomposting is a cool, shaded process. Direct sun dries the heap fast and makes the surface hostile to worms.
Using the wrong worm species. Garden earthworms and deep-burrowing nightcrawlers aren’t efficient surface decomposers. Always use Eisenia fetida or Eudrilus eugeniae specifically.
Harvesting too early. Unfinished vermicompost is phytotoxic — it can harm plant roots instead of nourishing them. Wait until the material is fully dark, earthy, and crumbly before applying it anywhere.
Why the Heap Method Works: Key Benefits
No infrastructure, no investment. The heap method requires nothing more than organic waste, worms, and open ground — making it the most accessible vermicomposting approach for anyone at any budget.
It’s also the only method where your heap sits in direct contact with the soil. Beneficial fungi, bacteria, and native organisms migrate up into the heap naturally from below — creating a biologically richer end product than any sealed bin can produce.
And the end product itself is exceptional. Vermicompost typically contains Nitrogen at 1.5–2.1%, Phosphorous at 1.0–1.5%, and Potassium at 0.60%, along with beneficial microorganisms including Azotobacter and Rhizobium that actively improve soil health long after application.
Finally, the heap method scales. Start with a 3×3 ft heap and grow it into a farm-level composting system using the exact same principles. New feedstock goes in at the top as finished compost is harvested from below — it’s a continuous, living cycle.
FAQ: Heap Method of Vermicomposting
How long does the heap method of vermicomposting take?
Typically 60–90 days, depending on heap size, worm density, climate, and feedstock type. Warmer temperatures and a larger worm population speed things up.
How many worms do I need to start?
About 1 kg of worms per tonne of organic waste, or 1,000–2,000 worms per square meter of heap base. You can start smaller — the population will grow naturally.
Can I do this during the rainy season?
Yes — but dig a simple drainage channel around the base of the heap. In very high-rainfall areas, a basic overhead shade structure helps prevent the heap from becoming waterlogged.
What’s the difference between heap composting and heap vermicomposting?
Heap composting is heat-driven microbial decomposition. Heap vermicomposting adds earthworms that work alongside microbes to produce vermicast — a higher-nutrient, biologically richer end product that requires significantly less turning.
What kitchen scraps can I add?
Vegetable peels, fruit scraps, tea leaves, coffee grounds (in moderation), and crushed eggshells all work well. Avoid meat, dairy, oily food, and large amounts of citrus — these attract pests and unbalance the heap environment.
Start Your Vermicompost Heap Today
The heap method of vermicomposting proves that the best solutions are often the simplest. No bin. No special equipment. Just organic waste, the right earthworms, and a shaded patch of ground – and in 60–90 days, you’re producing some of the most nutrient-rich soil amendment available to any gardener or farmer.
The formula is straightforward: layer thoughtfully, maintain moisture at 60–70%, protect your worms from light and temperature extremes, and let the biology do the work.
Start small if you need to. A 3×3 ft heap and 1 kg of red wrigglers is all it takes to begin. Your organic waste goes in — living compost comes out.
Happy composting! 🌱
Leave a Comment